Space X - Starlink installation without drilling
Table of content
- Introduction
- Initial tests
- First conclusion
- Find a proper location for dishy
- Pole setup
- Part1: How to get a wired connection to the router?
- Creation of box
- Part2: How to get a wired connection to the router?
- Houston: We need a larger pole!
- Final conlusion
- Next Steps
1. Introduction
After almost 5 years living in the same apartment with my regular slow internet provider. (Deutsche Telekom: Download speed ~9-10 Mbit/s). I was tired of the situation. By accident I stumpled accross the possibility to test Starlink for one month completly for free. In this blog post we are going to check the possibilties of setting up starlink in a rental appartment. Therefore we have some challenges:
- Drilling holes into (outer) walls is not an option
- Limited installation space - appartment is located in der first floor. No garden available. Only two balconies
- The setup shouldn't be too abvious for neighbors
- The solution has to work stable
- Download speeds should be significantly over 100Mbit/s
The main goal is to have Starlink as single internet provider without any fallback strategy. Only then the purchase and the monthly costs are worth it!
2. Initial tests
Initial tests are done on the main balcony which is directed into North-West direction. The Starlink dish is placed on a regular table and first messurements are done. Previously, the location of the table was already checked with the Starlink App, which wasn't promising at all. The app showed obstructions round about every 4mins. And in fact, the satelite connection was lost every 4 to 10minutes. Not optimal at all.
3. First conclusion
As we saw, the placement of the dish on the table was not a longterm solution at all. Therefore a more advanced solution has to be found. One of the key takeaways is, that the dish has to be mounted higher in order to have clear sight to the Starlink statellites.
4. Find a proper location for dishy
A few ideas to improve the sight:
- Mounting the dish on the wall
- Mounting the dish on an additional poles
- Try out the second balcony
Out of those three ideas, we can directly remove the second balcony, because there is no power socket available. Out of the remaining two options, the pole option looks at the first glance easier. Therefore we are going for that option first. Big advantage is that we can relocate the pole and therefore check several differnt positions on the balcony.
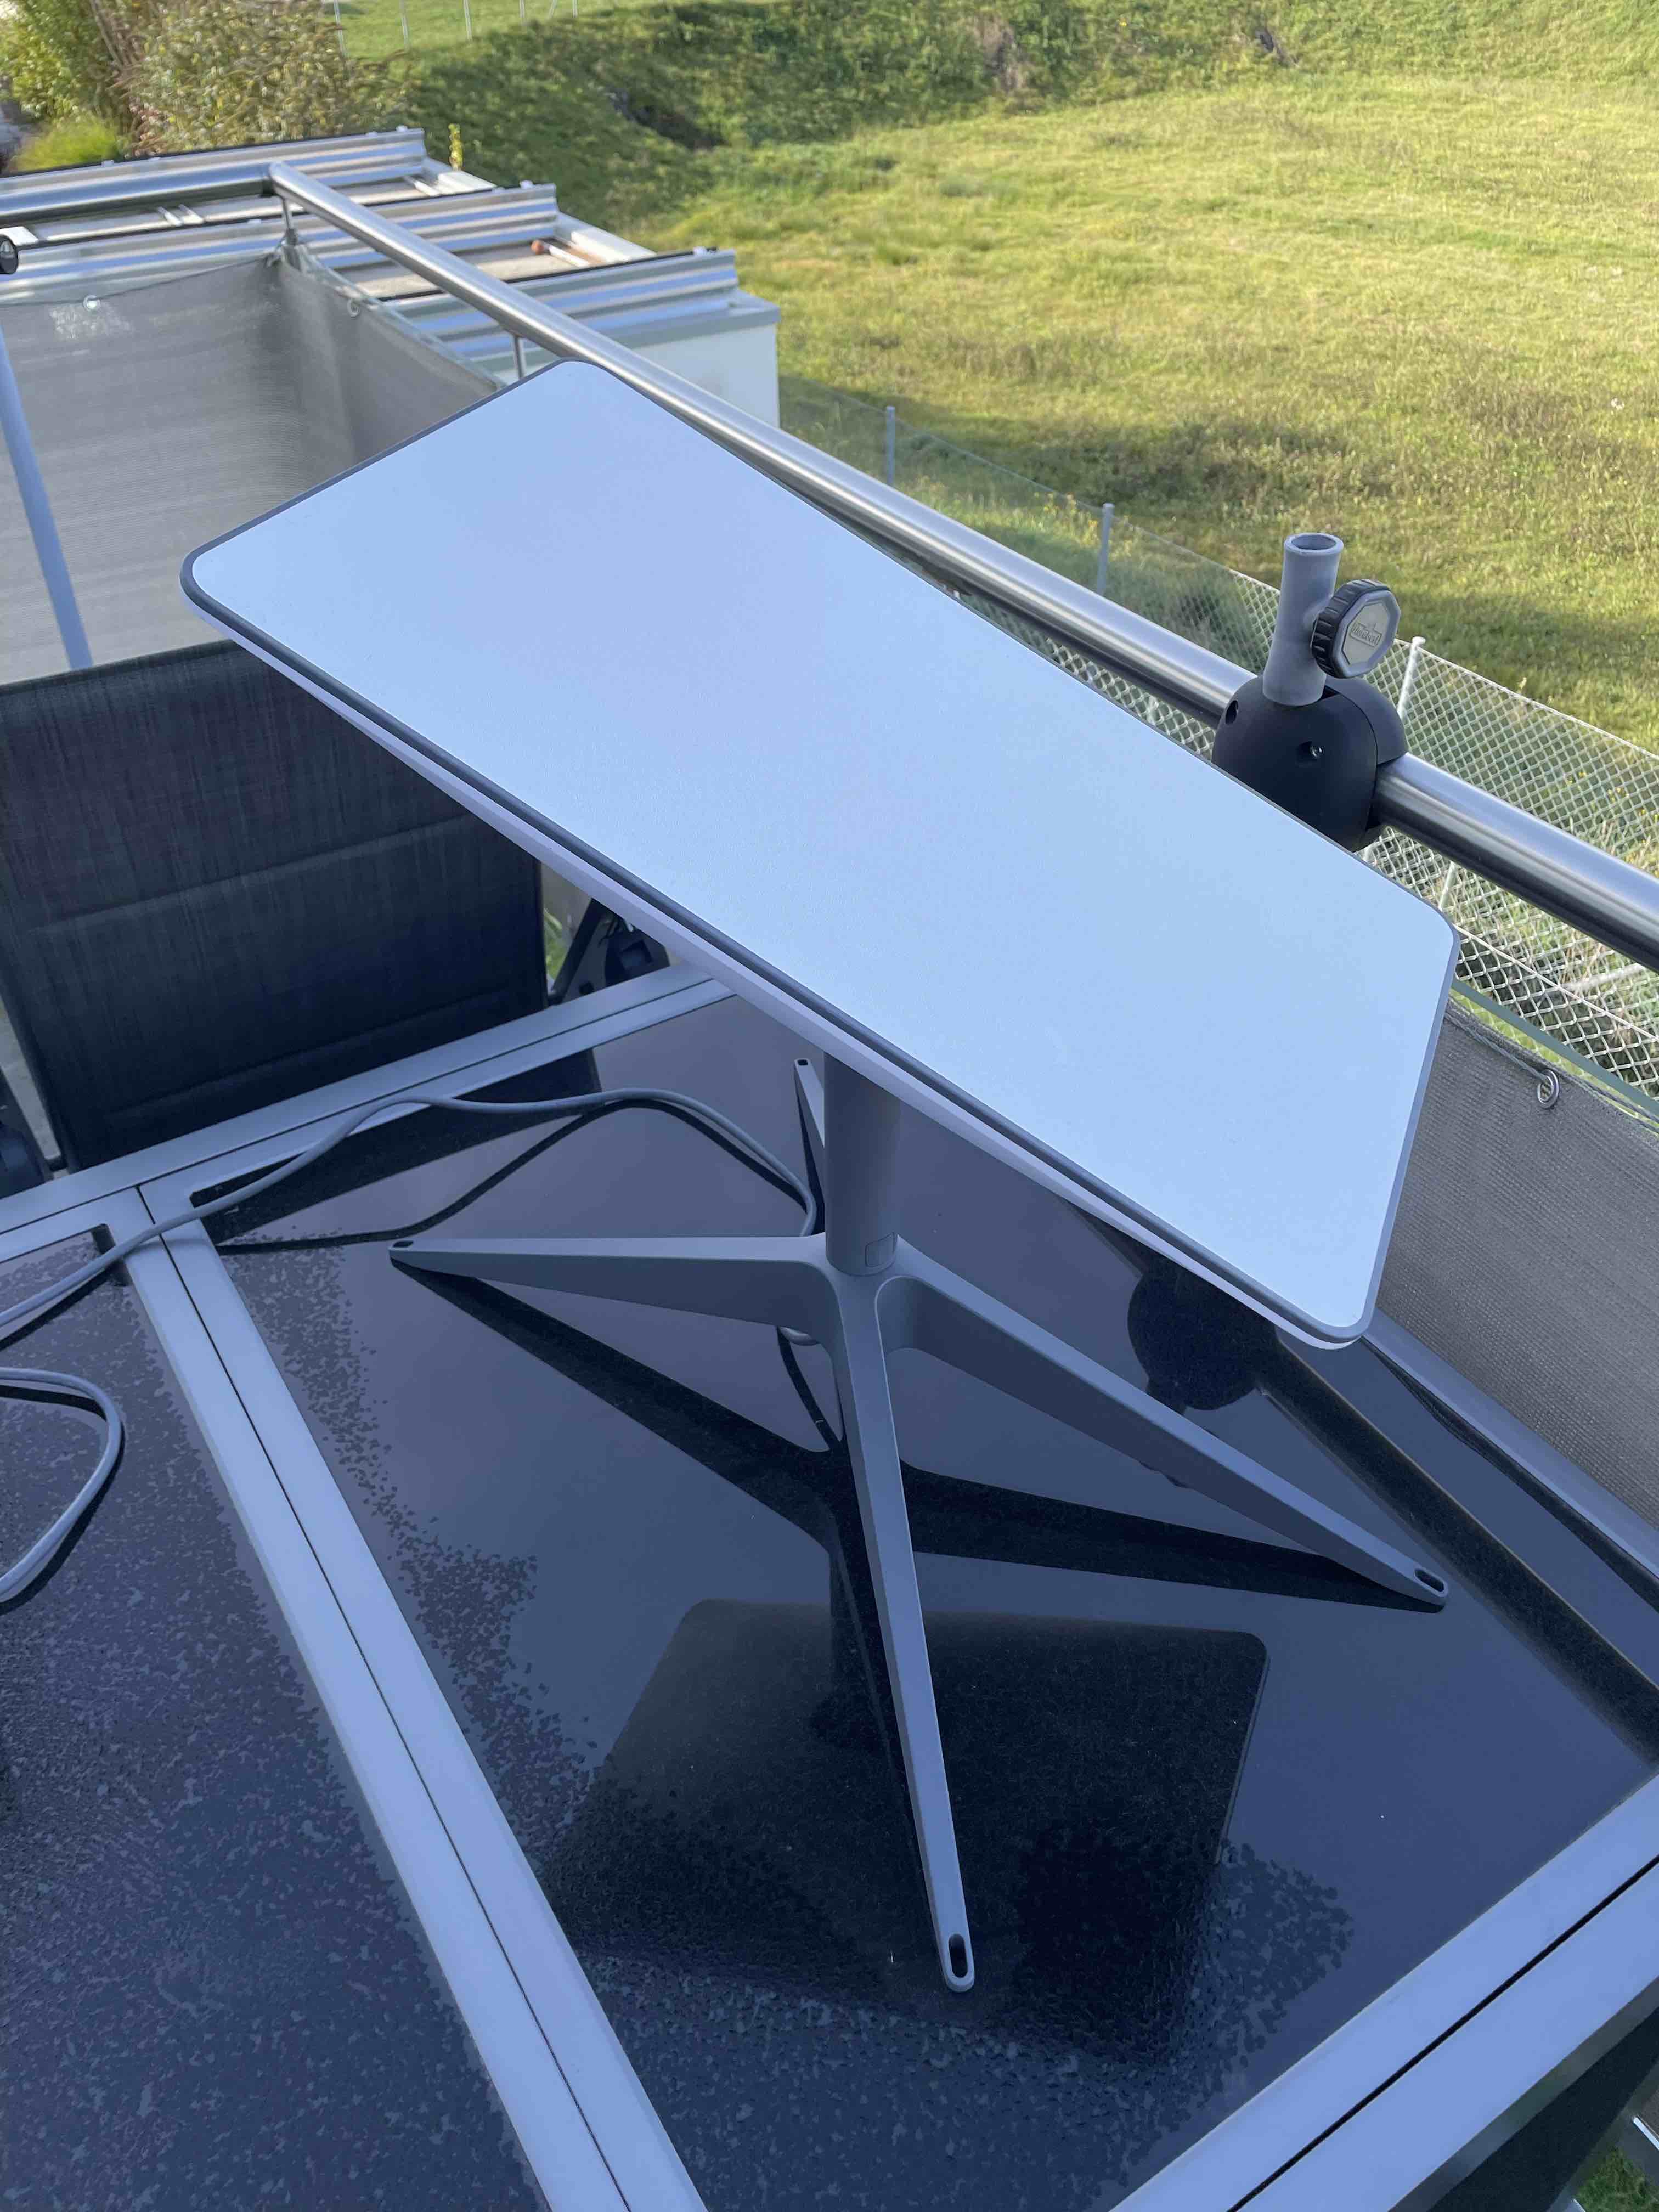
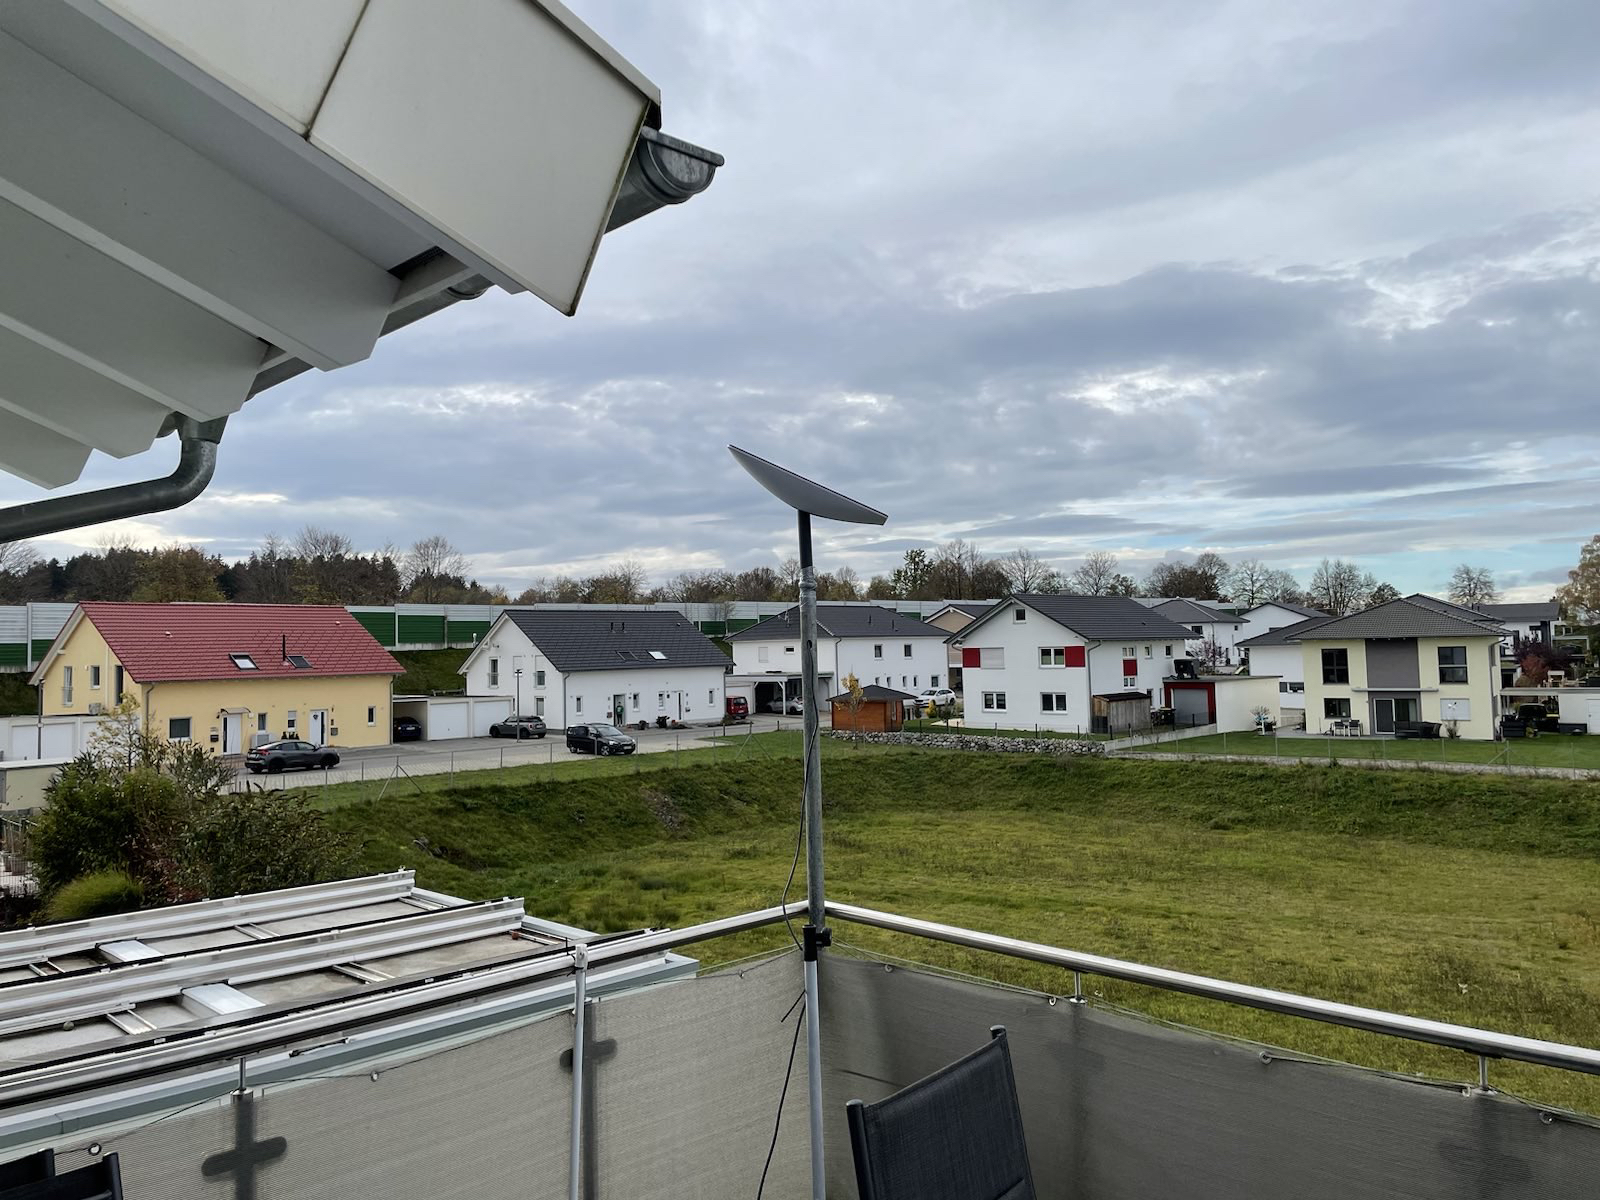
5. Pole setup
The intial setup was done with a pole with a length of 1.6m (5.25 feet). The pole diameter is 40mm (1.57 inches). The dish was mounted with gaffer tape. The cable is going through the pole itself. Afterwards the pole was mounted to the balcony railling with regular cable ties. First tests show that we have almost removed the obstructions. In order to make long term tests, we now have to find a solution to get the internet (hopefully wired) into the appartment. As initially said, drilling a hole is not an option. Let's think about possible solutions in the next chapter.
6. Part1: How to get a wired connection to the router?
Best case would be to have the starlink router inside the apartment. Unfortunately, the properitary cable connection between the dish and the router is too thick to get it underneath a window / a door. Only available option is to have the Starlink router outside on the balcony and then try to get a LAN connection underneath the windows. First things, first. Let's create the box.
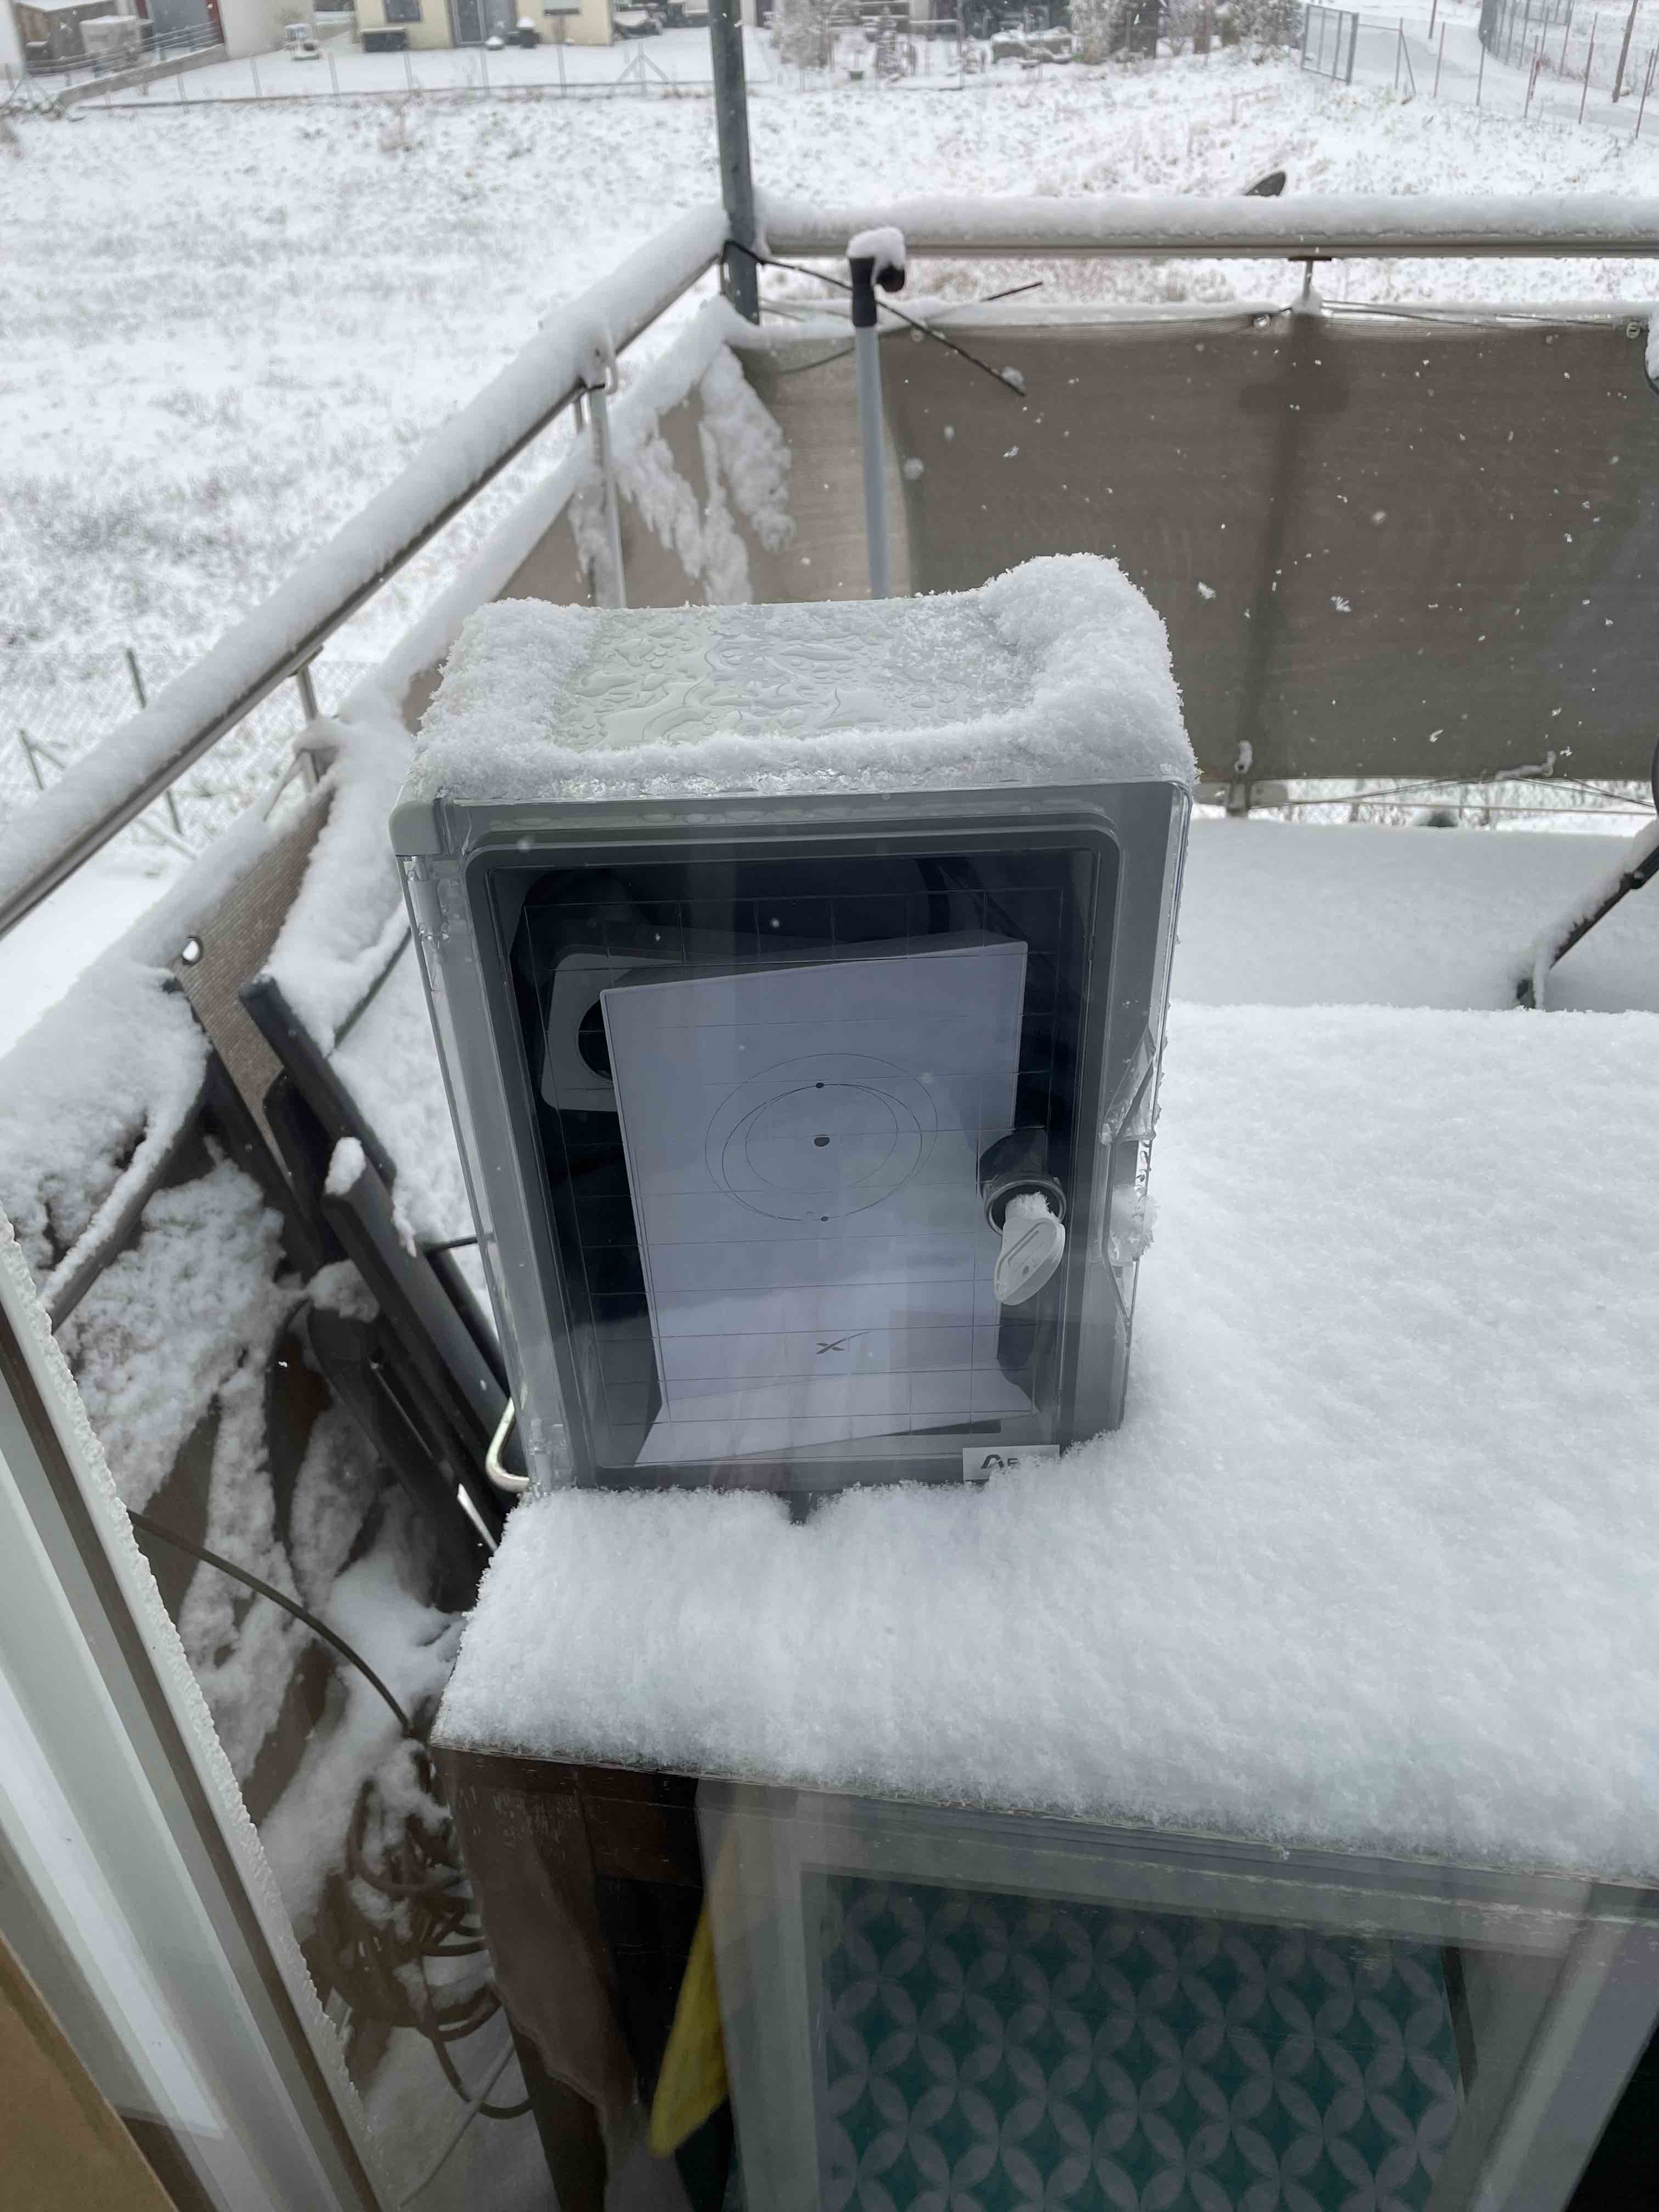
7. Creation of box
In order to protect the Starlink router from the outside weather conditions, especially rain and snow, the idea was to create a box with small cutouts. I found the following box on amazon* and ordered it. Luckly, it was directly a perfect fit. The door surroundings are completely completely coated with rubber/silicon, so the doors are waterproof. I then drilled a hole into the bottom of the box in order to get the cable through it. In the image below you can see the result.
Now that we have found a proper location for the router, we can now run some long term tests via the WiFi. Of course, I would prefer a wired connection to the router. Let's see how we can solve this topic.
8. Part2: How to get a wired connection to the router?
First idea was to get a LAN cable underneath the window/door. A quick research showed that there are feedthroughs available, but they are all limited to 100MBbps, which is definitely not optimal.
Second approach was to actually use Powerline adapters. The first test was done by borrowing old powerline adapters with small data throughput and it worked (with a quite slow connection). The actual speed highly depends on the distance and the actual power wiring of your apartment. Due to the fact, that I had just a rough idea how the wiring looks like in the aparment. I tried several different power sockets. To have an optimal data throughput the the power line adaperts should:
- be on the same power phase
- not have power fuses in between
- not use multiple socket outlets
At the end I also tried to the maximum speed when plugging them next to each other See image below for my highly sofisticated setup.
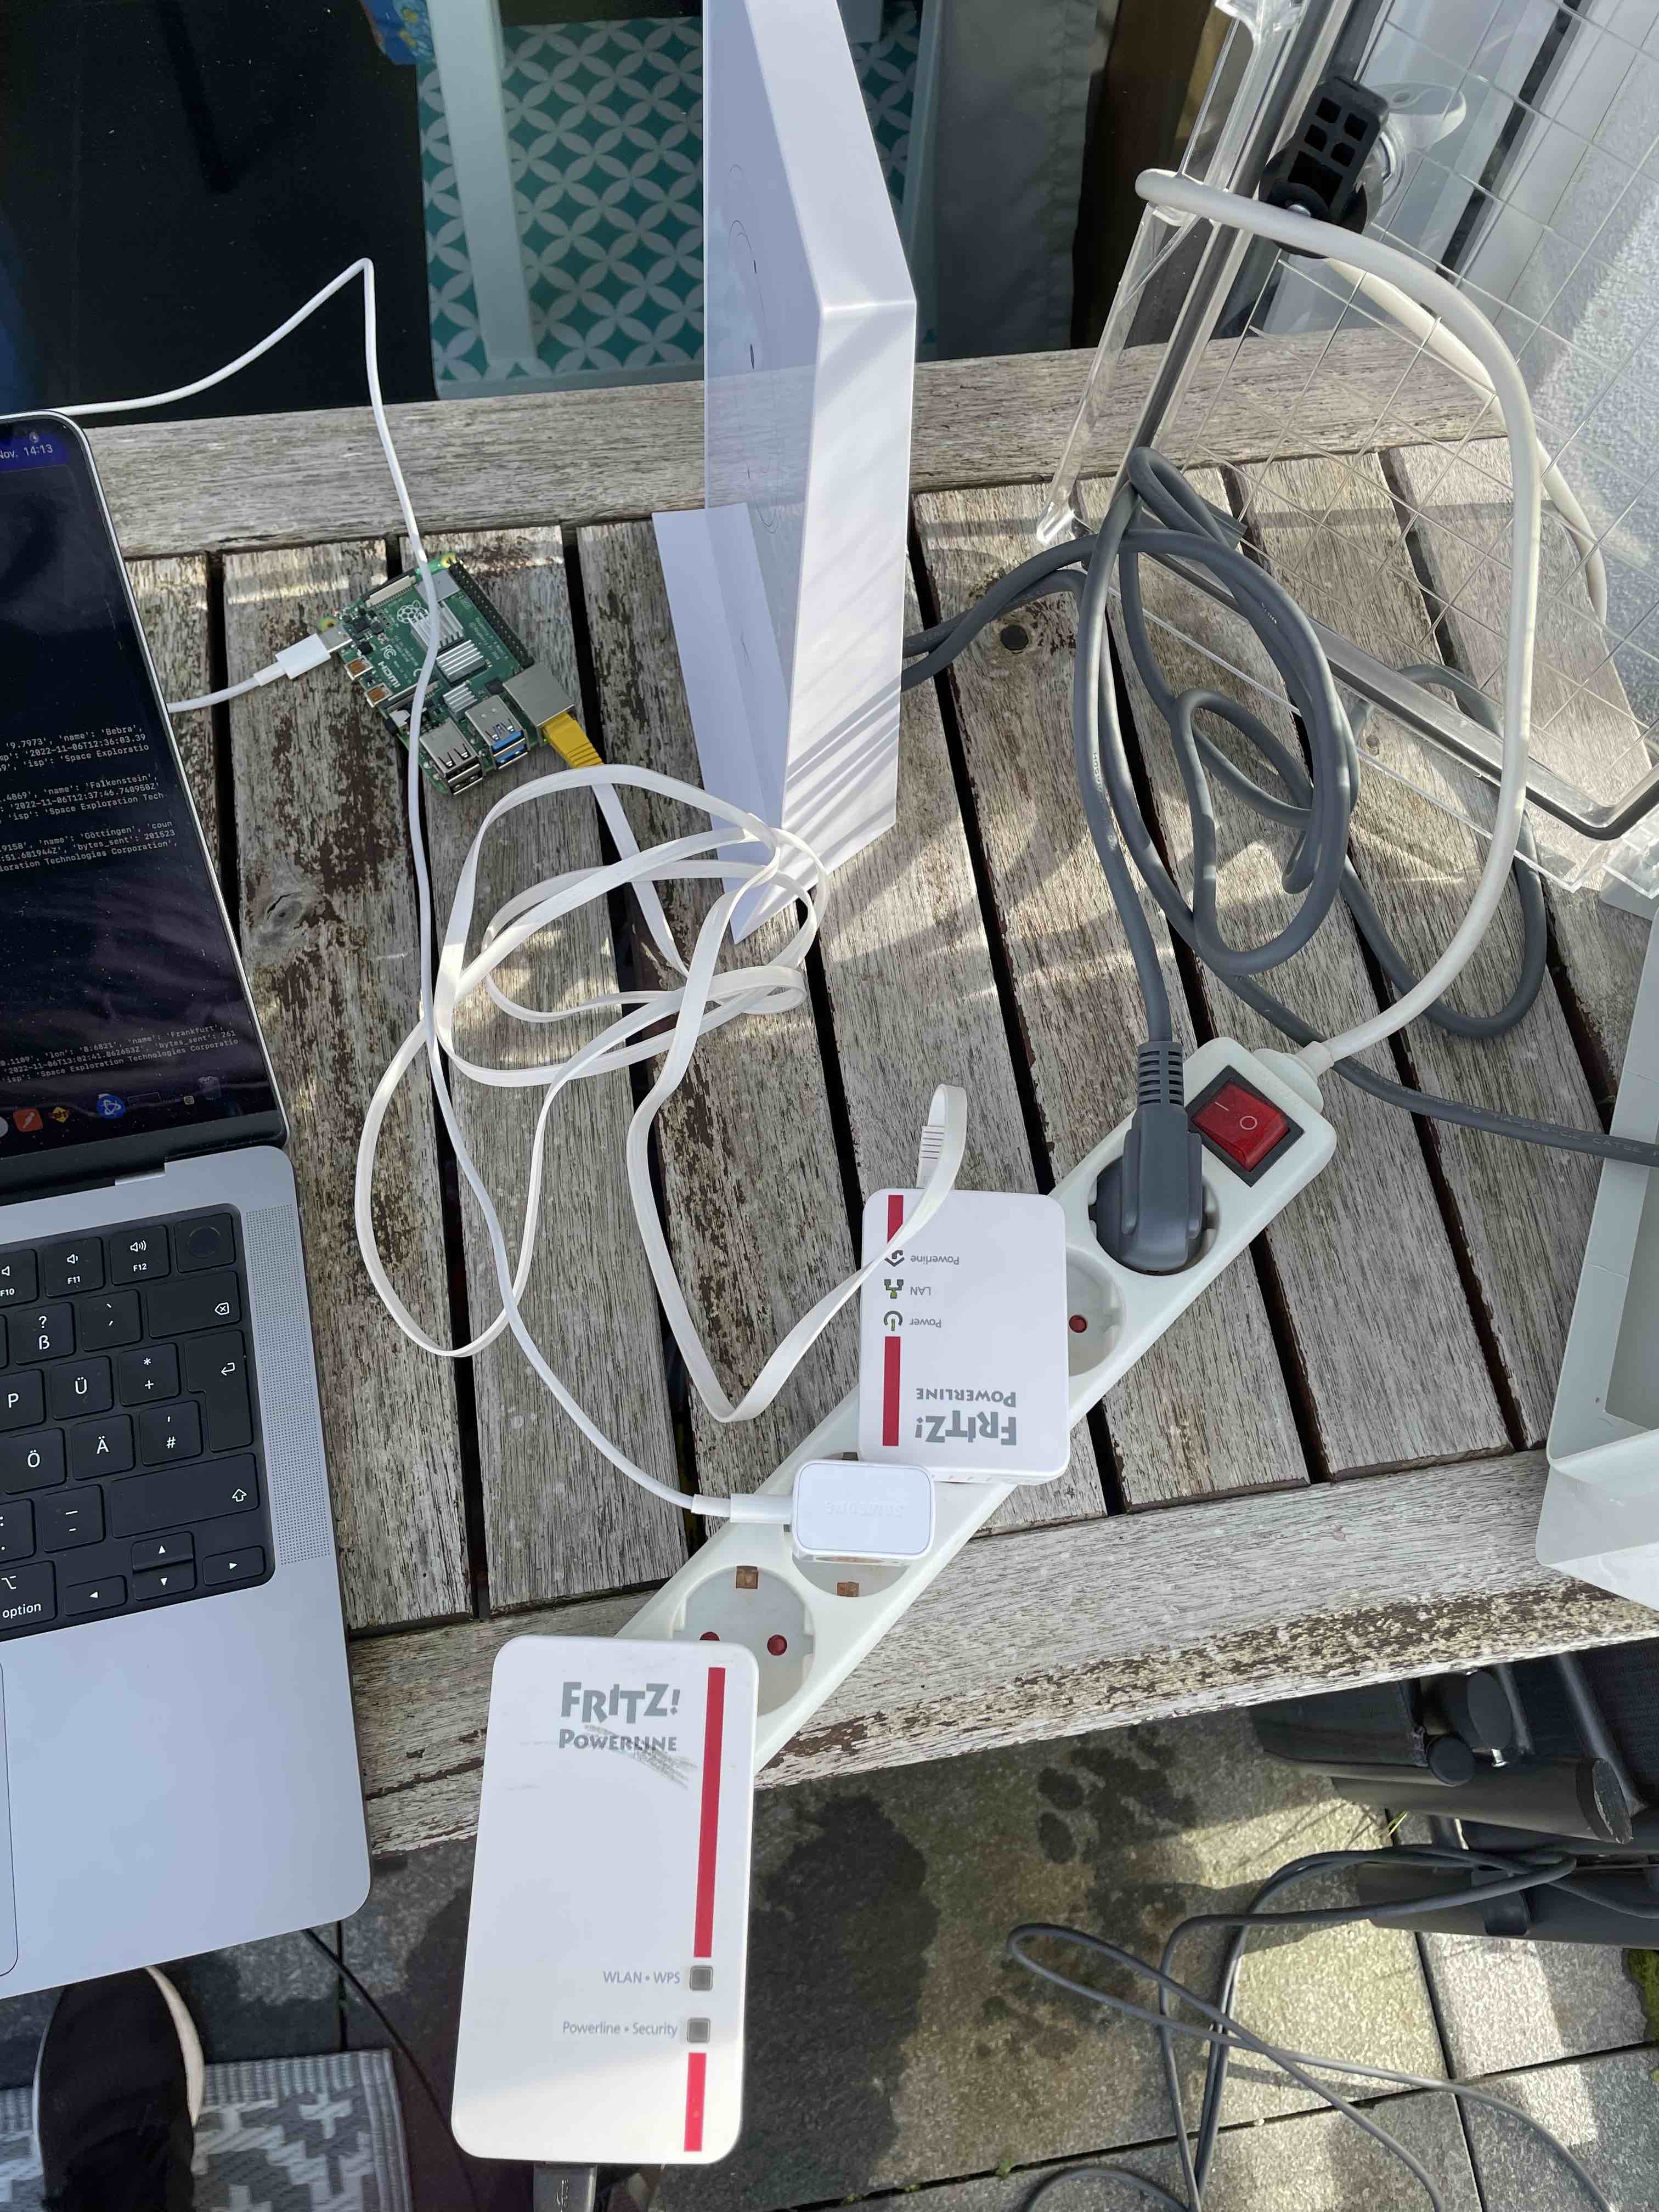
Under almost optimal conditions (I used the multiple socket outlet), I got speed rates of 71.43MBps Download and 35.36 Mbps Upload. Those results showed me that i have to upgrade my powerline adaperts. On the same day, I ordered two different powerline adapters:
And did some additional measuerments. Measurements where done with the final distance and power socket (which is next to my Lan Network).
| Powerline adapter | Transfer rate between adapters (send) | Transfer rate between adapters (receive) | Actual speed (download) average | Actual speed (upload) average |
|---|---|---|---|---|
| Fritz! Powerline 540E | 189 Mbit/s | 186 Mbit/s | 33Mbit/s | 28 Mbit/s |
| TP-Link Wlan Powerline 12000 Mbit/s | 420 Mbit/s | 418 Mbit/s | 70 Mbit/s | 29 Mbit/s |
| devolo Magic 2 Wifi 2400 Mbit/s | 840 Mbit/s | 567 Mbit/s | 194 Mbit/s | 35 Mbit/s |
Small excursion regarding powerline adapters
As we can see from table above, the maxium data throughput is only possible on short distances, without any additional power sockets/fuses on the same phase. The transfer rate between the adapters is in my case ~35% of the maximum possible speed. Out of this maximum possible speed you can get roughly 25% as actual speed, which matches quite well the results from above. My final choice is therefore the devolo Magic 2.
TL;DR: For Powerline adapters higher transfer rates are really important, don't try to save money here. The more, the better
9. Houston: We need a larger pole!
Finally, we have a wired connection to the Starlink router and can therefore do some more tests. Now it's the first time, that I am disabling my regular internet access in order to a first real world test. Unfortunately, the disappointment came quite early. I had quite some connection issues. After 12hours, the Starlink app showed me that I am still having obstructions and connection losses roughly every 12th minutes.
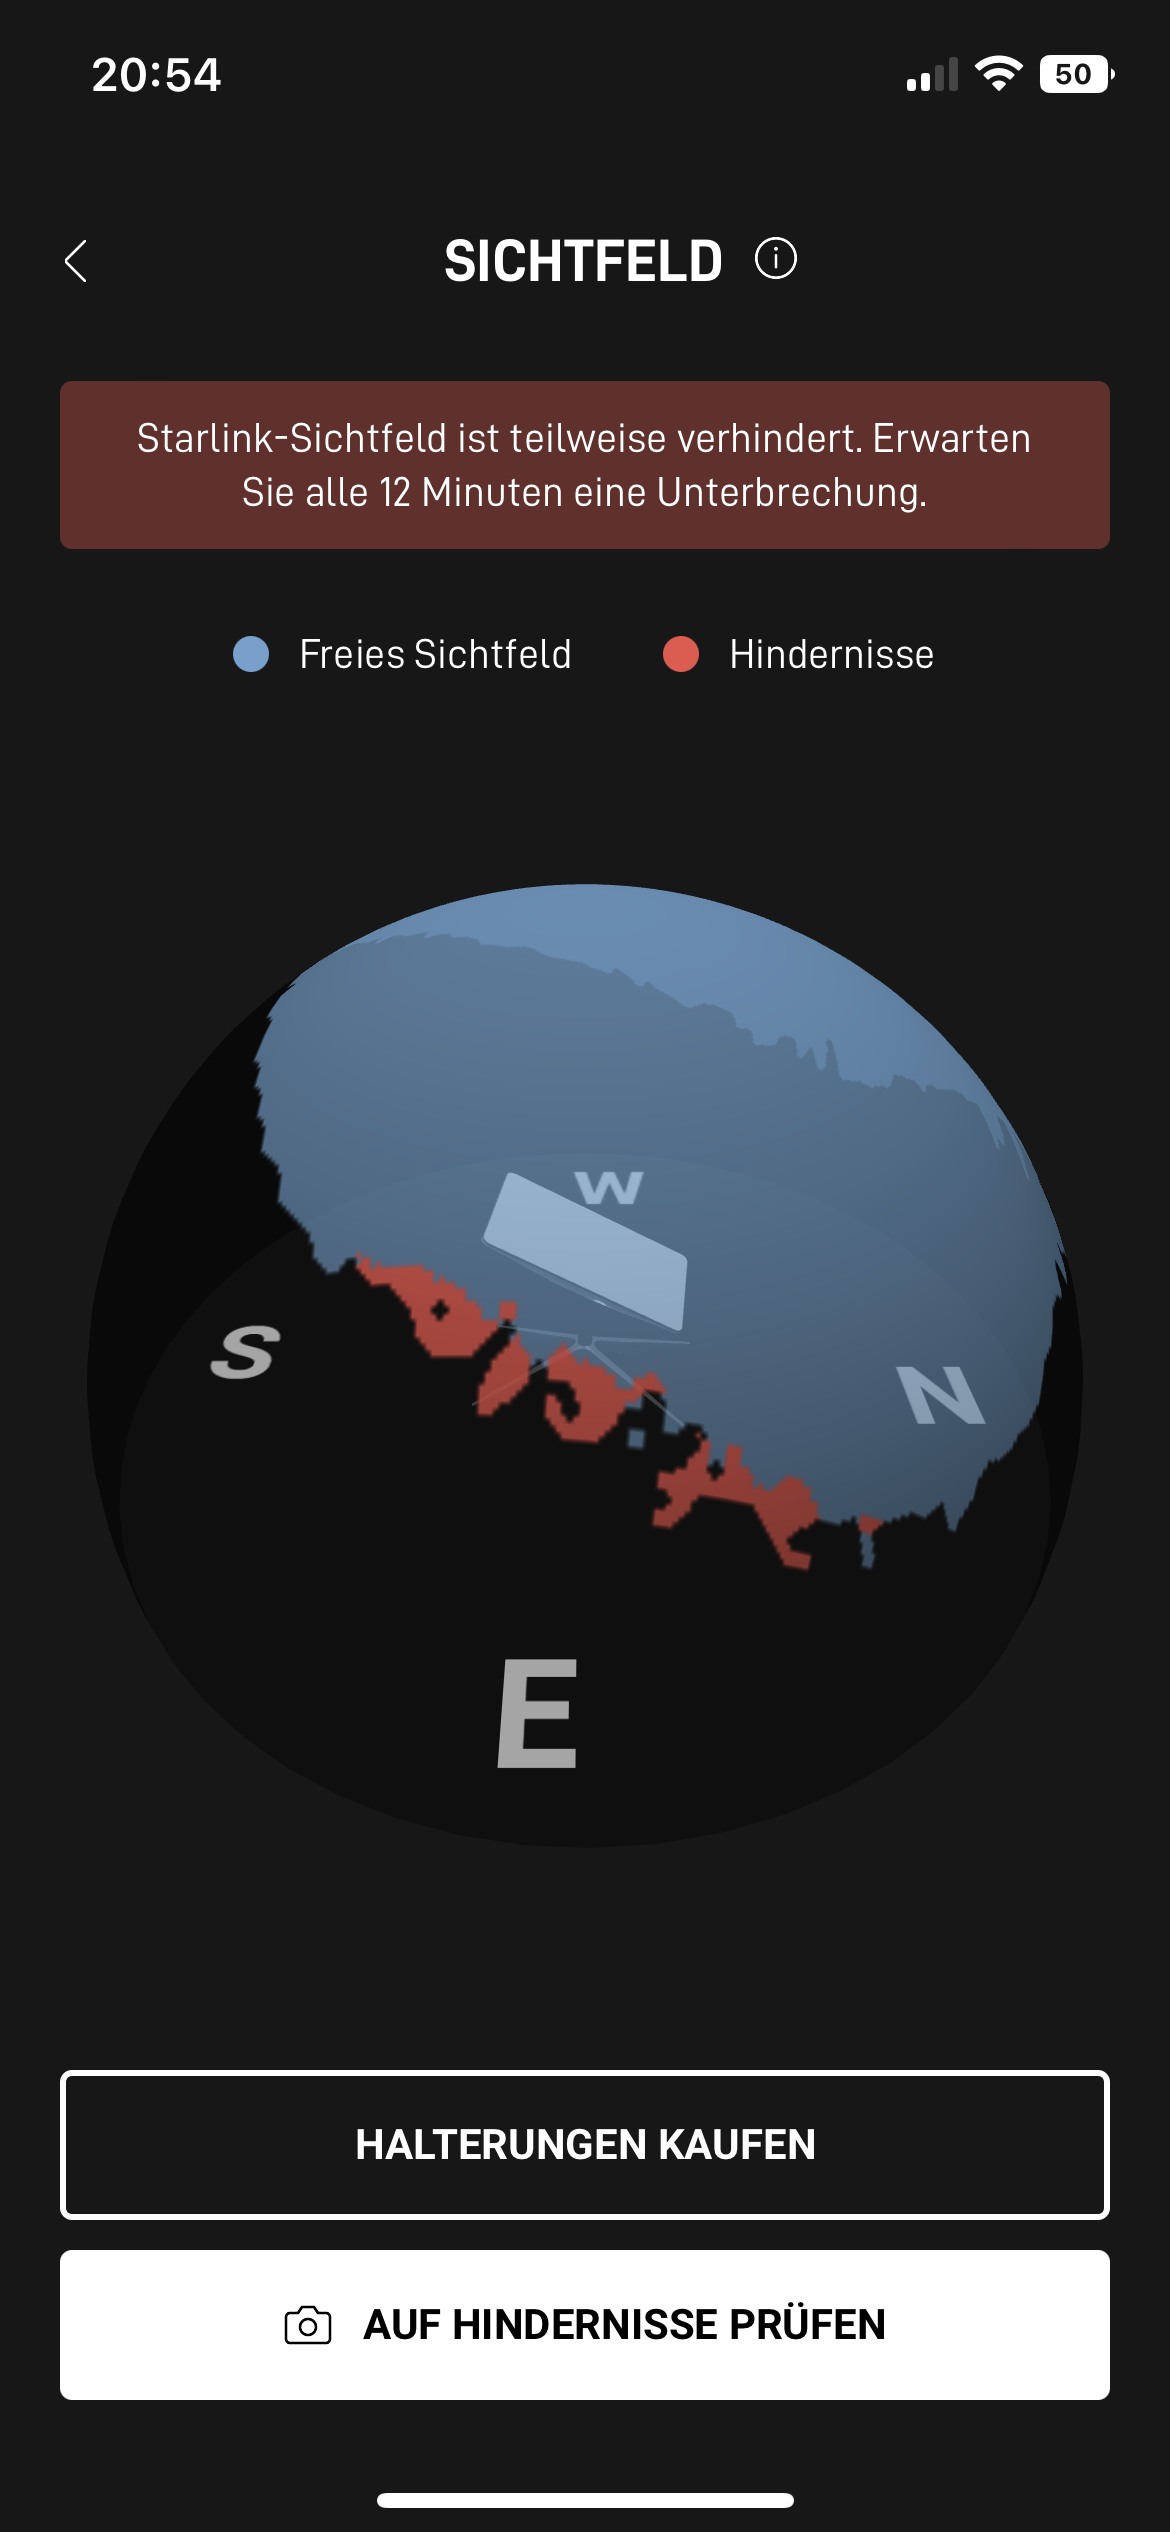
In this case the Starlink app was helpful again, I was able to directly indicate that still a small portion of the roof is causing the obstructions. Therefore, I created a second pole. This time with the maximum length of 2.3m (7.53 feet). I also replaced my gaffer taped connection with the official Starlink pole adapter, which is from my perspective quite expensive, but does the job quite well. Again, I used cable ties to install the larger pole to the balcony railling.
10. Final conlusion
This setup is now running since beginning of November 2022. Since December 2022 Starlink is my only internet provider. Since then I had two bigger outages (one was auto resolved after ~15mins the other one needed less than 10mins). In the below line chart the average speed and ping rates are visible.
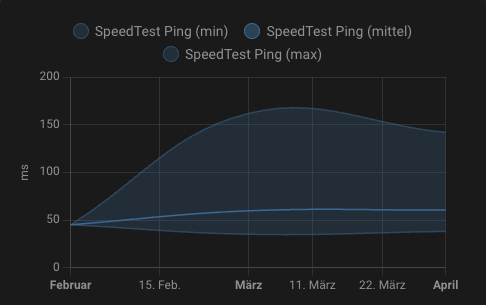
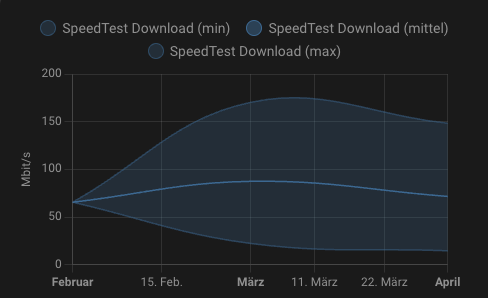
I use Starlink for my daily work (MS Teams, Google Meet), which works absolutely fine. As I also occasionally play online video games, I have also tried the online gaming abilities, which are fine in most cases. Of course, sometimes you can get long latencies, you might some lags, but in general the epxerience was quite fine. For occasional online gaming, I think it's okay. For e-sports enthusiasts, I don't think it's a good option.
11. Next steps
- Create a 3d printed mounting for the pole
- Keep the articel up to date, in case of any outages/problems
(*)Affiliate Links. As an Amazon affiliate I earn from qualified sales